Team Management
The Team Management page is where school administrators control who has access to Junipa and what each staff member can do. From here you can view your full team, invite new users, edit existing accounts, and manage roles and permissions.
Viewing Your Team
- Navigate to Administration from the main sidebar.
- Under the Team section in the left-hand menu, click Manage users.
The Team Management page displays a table of all staff members with the following columns:
- Name: The staff member's display name.
- Email: Their login email address.
- Last Login: The date they last signed in to Junipa.
- Dashboard: The dashboard view the user sees by default, such as Groups or Class Timetable.
- Roles: The roles assigned to the user, shown as badges.
- Status: Whether the account is Active, Invited, Inactive, or Deleted.
- Created: The date the account was created.
- Auth Provider: The sign-in method used, such as Google.
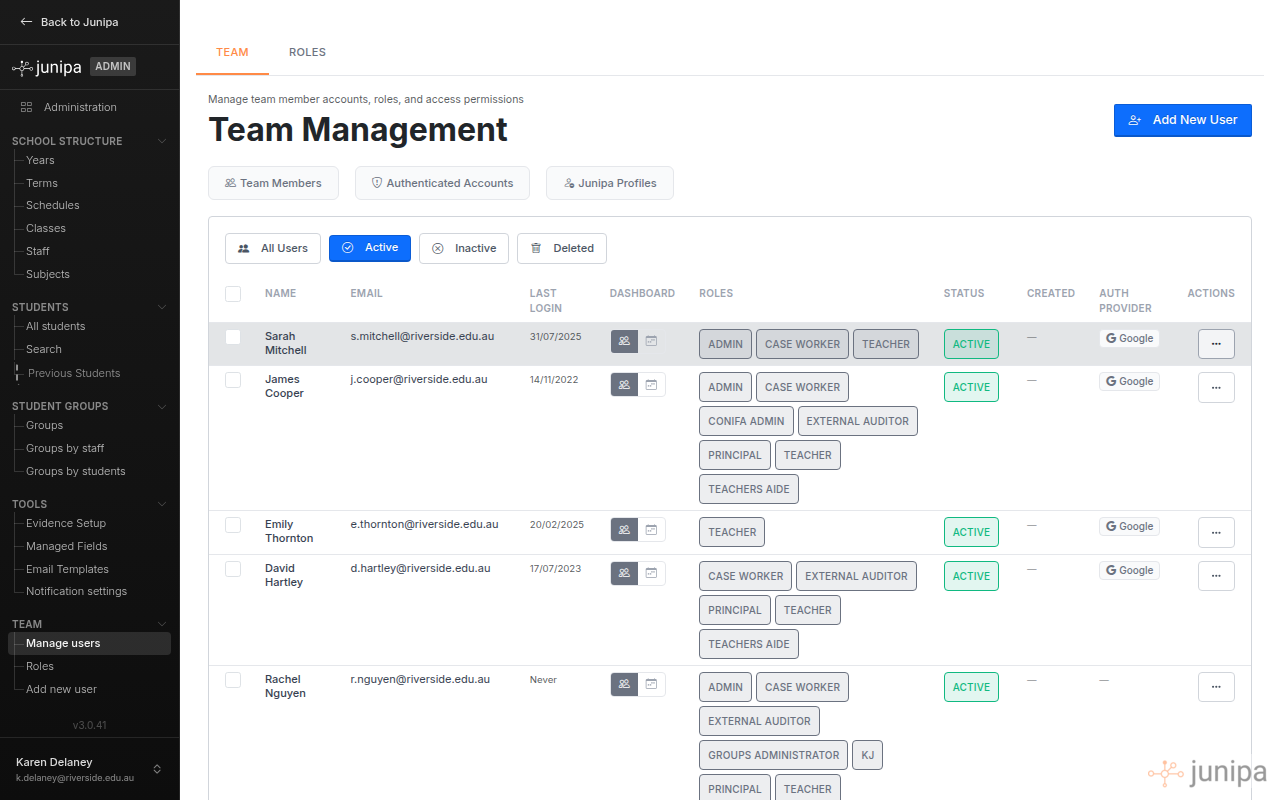
Filtering Users
Use the filter buttons at the top of the table to narrow the list:
- All Users: Shows every user regardless of status.
- Active: Shows only users who are currently active and can sign in.
- Inactive: Shows users whose accounts have been deactivated.
- Deleted: Shows users who have been removed from the system.
Section Navigation
Below the page header, three shortcut buttons let you jump to different sections of the page:
- Team Members: The main user table.
- Authenticated Accounts: Accounts that exist in the authentication system but have not yet been linked to a Junipa user profile.
- Junipa Profiles: Profiles that exist in Junipa but do not have a matching authentication account.
Adding a New User
-
Click the Add New User button in the top-right corner of the Team Management page, or click Add new user in the left-hand sidebar under Team.
-
Fill in the new user's details:
- First name: The staff member's first name as it will appear in Junipa and NCCD reporting.
- Last name: The staff member's surname.
- Email: The email address the user will use to sign in. This must match the email address associated with their school's sign-in provider, such as their Google Workspace email.
-
Under Permissions, select one or more roles for the user by ticking the relevant checkboxes. You must select at least one role, otherwise the user will be able to log in but will not have access to any functionality.
-
Click Add user to send the invitation.
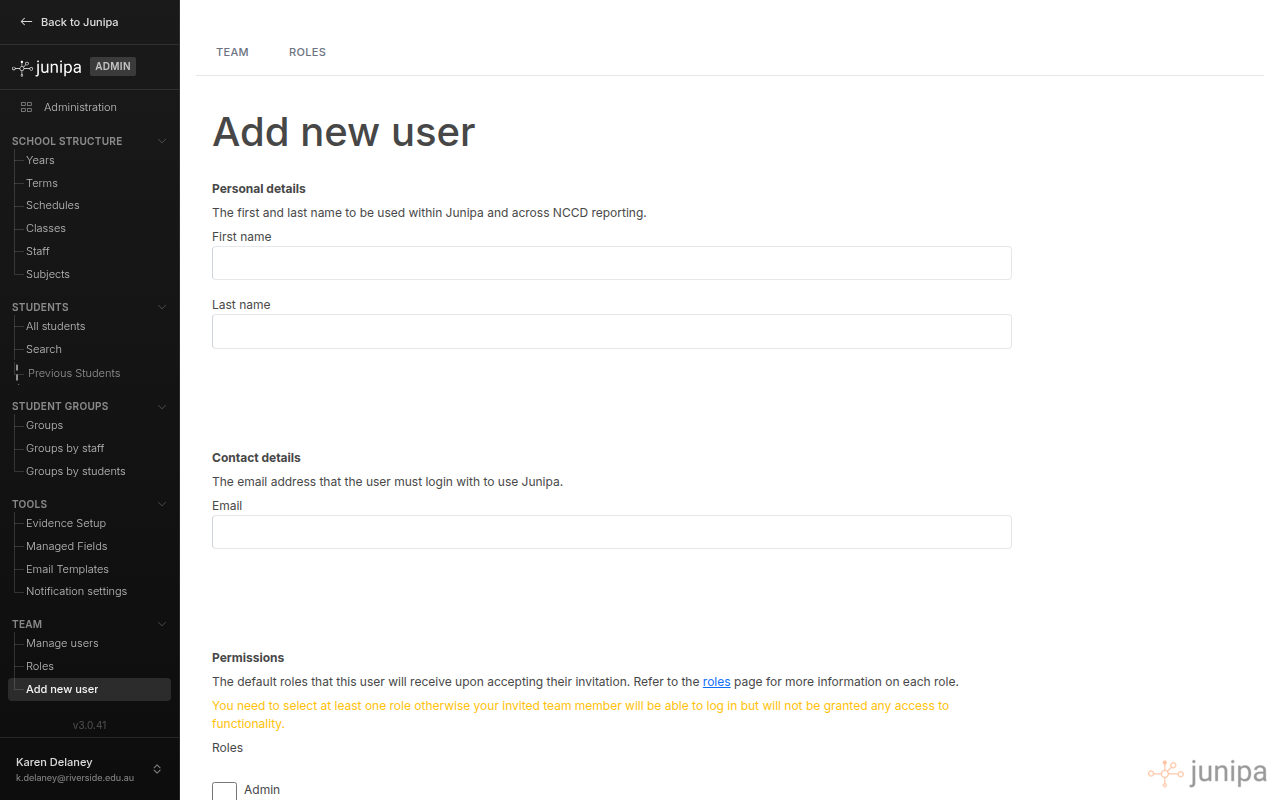
The new user's account will be created with an Invited status. Once they sign in for the first time using their school email, their status will change to Active.
Editing a User
- On the Team Management page, find the user you wish to edit.
- Click the actions menu (three-dot icon) in the far-right column of their row.
- Select Edit User from the dropdown.

-
On the Edit User page, you can update:
- Display Name: The name shown throughout Junipa. This value may be overwritten if the user signs in via SSO.
- Email Address: The login email. Changing this will immediately prevent the user from signing in with their previous email address.
- Status: The account status, which can be set to Invite Requested, Invited, Invite Rejected, Invite Accepted, or Active (Signed up).
-
Click Save Changes to apply your updates, or Cancel to return to the team list.
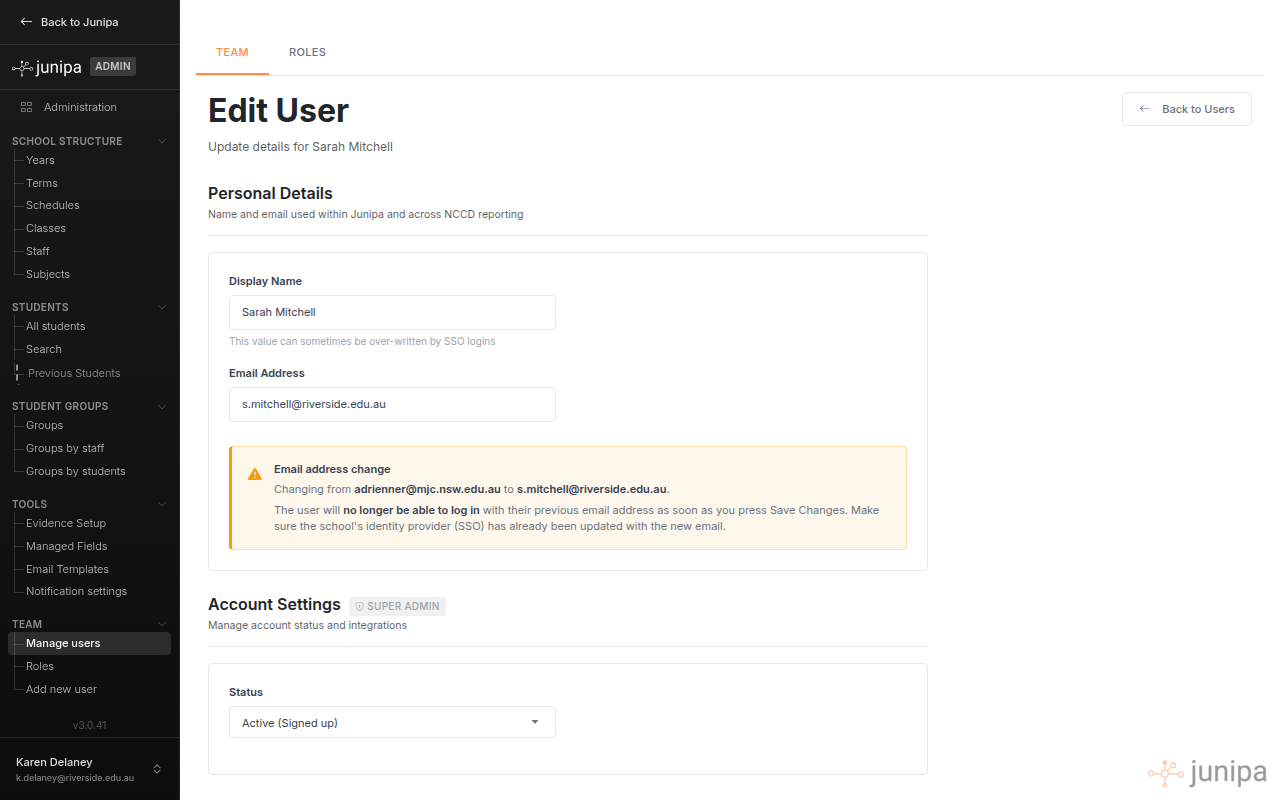
Changing a user's email address takes effect immediately. The user will no longer be able to log in with their previous email. Ensure the school's identity provider (SSO) has already been updated with the new email before making this change in Junipa.
Managing Roles
- On the Team Management page, click the actions menu for the relevant user.
- Select Manage Roles from the dropdown.
- On the Roles page, tick or untick the roles you wish to assign or remove.
- Save your changes.
Available Roles
| Role | Description |
|---|---|
| Admin | Full access to all features including administration, student management, reporting, and team management. |
| Teacher | Can view assigned students on the dashboard and record evidence for those students. Cannot access administration or team management. |
| Case Worker | Can manage assigned students, record evidence with additional detail, and view evidence history. Broader student access than Teachers but cannot access administration settings. |
| Principal | Access to reporting and oversight features across all students and staff. |
| External Auditor | Read-only access to evidence and reporting for audit purposes. |
| Teachers Aide | Similar to Teacher but tailored for support staff working alongside classroom teachers. |
Your school may have additional custom roles configured. The roles listed above are the most common. Contact your Junipa administrator if you are unsure which role to assign.
Authentication Providers
The Edit User page includes an Authentication Providers section that shows how the user signs in to Junipa. This section displays:
- Account Created: The date the authentication account was first set up.
- Last Sign-In: The date of the most recent successful login.
- Last Token Refresh: The date the user's session was last renewed.
- Email Verified: Whether the user's email address has been verified.
- Linked Providers: The sign-in methods connected to the account, such as Google or Microsoft.

Deactivating a User
To temporarily remove a staff member's access without deleting their account:
- Click the actions menu for the user.
- Select Deactivate.
- The user's status will change to Inactive and they will no longer be able to log in.
To reactivate the user later, click the actions menu again and select Activate.
Deleting a User
To permanently remove a user's access:
- Click the actions menu for the user.
- Select Delete User (found under the Super Admin section of the dropdown).
- Confirm the deletion.
Deleting a user does not remove any evidence they have recorded. All evidence remains attributed to them in the audit trail. Deleted users can be viewed by selecting the Deleted filter on the Team Management page, and can be restored if needed.
Best Practices
- Review team access regularly: Remove or deactivate access for staff who have left the school or changed roles.
- Use the appropriate role: Only assign Admin access to staff who need to manage settings and team members. Most teaching staff should be assigned the Teacher or Case Worker role.
- Ensure at least two Admins: Having more than one administrator ensures access to settings is maintained if one admin is unavailable.
- Match email addresses carefully: The email entered for a new user must match the email associated with their school's sign-in provider (e.g. Google Workspace). A mismatch will prevent them from logging in.
Troubleshooting
| Issue | Solution |
|---|---|
| User cannot log in after being added | Ensure the email address in Junipa exactly matches the email associated with their school sign-in provider (e.g. Google Workspace). Check that their status is Active. |
| User can log in but cannot see any features | Check that at least one role has been assigned. Navigate to the user's roles and ensure the appropriate role is ticked. |
| User shows as "Invited" but never signed in | The user may not have attempted to log in yet. Ask them to sign in using their school email. Their status will update automatically. |
| Need to change a user's email address | Edit the user and update their email. Note this takes effect immediately. Coordinate with the user and your IT team to ensure the new email is ready in your identity provider first. |
| Accidentally deleted a user | Use the Deleted filter to find the user, then click their actions menu and select Restore. |