Student emails belong with the student records
An email about a student is often evidence, but only if the school can still find it when the record is reviewed.
Student email inboxes give each student an opaque Junipa address, so relevant emails and attachments can land against the student record first, then be reviewed before they become evidence or documents. The point is not to create another inbox for staff to watch. The point is to stop important support context from living only in a personal mailbox.
This workflow is enabled with Junipa Support. It needs the school domain, sender rules and moderation defaults checked before staff start forwarding emails.
The address should not identify the student
A student inbox address should be opaque. It should not include the student's name, student number, date of birth, year group or diagnosis.
Use an address that looks random, for example:
stn-4f9c1a2b3d4e@example-school.junipa.com.au
That address belongs to the student record, but it does not advertise who the student is. If a teacher, allied health provider or support staff member forwards an email to that address, Junipa can connect the message to the student record without putting personal details in the email address itself.
Do not publish student inbox addresses in public documents. Treat them like internal record routing addresses.
Turn on the inbox defaults before the first email arrives
When Junipa Support has enabled student inboxes for your school, open Administration > General Settings and check the Student Email Inbox defaults.
This screenshot uses obfuscated example data. It shows the settings only, with no real school, staff or student details.
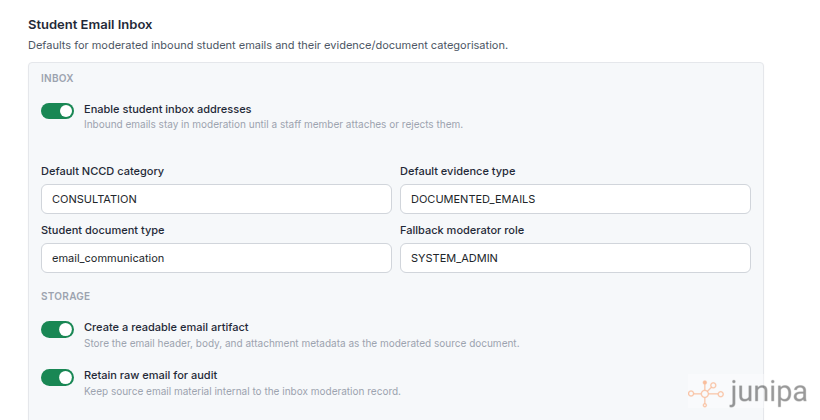
Check these settings before staff start using the workflow:
- Enable student inbox addresses: turns on inbound student addresses after support has provisioned the routing.
- Default NCCD category: sets the starting category for emails that become evidence.
- Default evidence type: keeps emailed evidence consistent, usually as documented emails or communication.
- Student document type: sets the document type when an email is saved to the student documents area.
- Fallback moderator role: decides who can pick up emails that do not match a specific staff member.
- Readable email artifact: stores a readable copy of the email header, body and attachment list.
- Raw email retention: keeps source material available for audit where your school has chosen to retain it.
If you are unsure about the default category or document type, choose the plainest option that describes the school record. Do not make the category more specific than the email itself can support.
Send only record-worthy emails
The inbox is for student support context that should be part of the student record. It is not a general mailbox, a behaviour incident inbox, or a place to dump every message with the student's name in it.
Good examples include:
- A parent or carer email that confirms an adjustment or support need.
- A teacher email with an attached modified task, timetable, learning support note or work sample.
- A specialist or allied health email that explains a recommendation the school is using.
- A meeting follow-up that records agreed adjustments, review timing or responsibility.
- A staff email that connects an attachment to the student's support plan.
Poor examples include:
- Casual scheduling messages with no record value.
- Emails about multiple students where only one student inbox address is used.
- Sensitive medical or family information that should be handled through a more restricted process.
- Long email chains where the useful record is one short attachment or summary.
If the email covers more than one student, split the evidence before sending it into Junipa. Each student's record should tell that student's story, not expose another student's details.
Pending emails need moderation
Inbound student emails do not become evidence automatically. They arrive as pending items first.
On the student record, staff can see when a student inbox email is waiting for review. This screenshot uses a fake sender, fake subject and fake date.
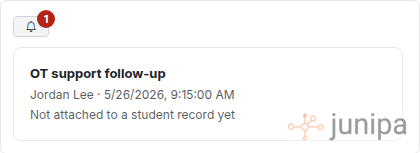
Review the pending email before it becomes part of the record:
- Open the student record.
- Check the inbox indicator near the student record tools.
- Open the pending email and read the stored email copy.
- Confirm the email belongs to this student.
- Decide whether it should become evidence, a student document, or be rejected.
- Add a short note if the decision needs context.
That moderation step matters. It protects the student record from accidental forwards, unclear email chains and messages that mention the student but do not explain an adjustment.
Keep the email useful after census week
Before accepting an email into the student record, ask whether it will still make sense later.
A useful student email record answers at least one of these questions:
- What support was discussed or agreed?
- Which adjustment does the email explain?
- Who provided the information?
- What file or attachment should be kept with the record?
- Does the email show consultation, adjustment, monitoring or reviewed support?
The subject line alone is rarely enough. If the email body is vague but the attachment is useful, keep the attachment and add enough context in the evidence record for another staff member to understand why it matters.
Use the email report for follow-up
Schools with the student email inbox workflow can use the communication email log and email-augmented evidence views to follow up inbound messages by status.
The useful review pattern is:
- Check Pending moderation for emails still waiting on a decision.
- Check Accepted evidence for emails that became evidence.
- Check Saved documents for emails stored as student documents.
- Follow up rejected or archived items only when the decision is unclear.
This gives leaders a way to check the workflow without asking every teacher to search their own mailbox.
Roll it out slowly
Start with one student group, one support team or one evidence collection task. Make sure staff understand the difference between "send this to the student record" and "send this to a person".
A small rollout should answer these questions:
- Who can send into student inboxes?
- Which sender domains are allowed?
- Who moderates pending emails?
- Which evidence category should be the default?
- When should an email be saved as a document instead of evidence?
- What should staff do when an email mentions multiple students?
Once those rules are clear, the workflow becomes straightforward: use the opaque student address, review the pending item, then keep the record where future staff can find it.
The win is simple. The evidence does not vanish into a mailbox when a staff member changes role, goes on leave or leaves the school.