Removing a thousand paper cuts, starting with the plan editor

None of these would make a roadmap. A sign in that forgets where you were going. A text box that hides the sentence you are writing. A back button that wipes the filters you just set.

None is a bug. Each costs about four seconds and a small sigh. Multiply that across a staffroom and a week, and it adds up to real time. Here are the first ones, closed.

How something so simple gets complex: deleting evidence without erasing history

Deleting a mistaken evidence record should be simple for the person doing it. The complexity belongs behind the button, where Junipa has to remove the record from daily work without pretending it never existed.

Recently that simple action failed for a staff member deleting evidence they had recorded themselves. The confirmation appeared, but the live school service did not recognise the request. The safe outcome occurred: nothing was partly deleted. The frustrating outcome also occurred: a valid action could not be completed.

That failure exposed how wide the promise of one Delete button really is.

Accept anything, trust nothing, and show your work in between

There is a piece of design advice older than the web, and it has aged better than almost anything written since. The Nielsen Norman Group frames it through two of its usability heuristics that pull against each other on purpose, flexibility and efficiency of use on one side, error prevention on the other. Engineers know the same idea as the robustness principle. Be liberal in what you accept, and conservative in what you produce. Take in whatever the world hands you. Hand back only what you can stand behind.

We built two things recently that live entirely inside that one sentence. The report builder now imports almost any spreadsheet a school can throw at it, and the new Mail Drop lets people email into Junipa for the first time. They look like different features. They are the same problem wearing two costumes, a wide and forgiving front door, and a narrow and strict exit.

Trauma support and NCCD inclusion

A student can need serious trauma-informed support and still need a separate NCCD inclusion decision.

The national NCCD Guidelines are the source of truth. They say students affected by trauma should only be included in the NCCD when they have a disability under the Disability Discrimination Act and meet the other NCCD inclusion criteria.

Staff Activity Recency View

Staff Activity Recency View is for schools that need a focussed follow-up list without putting the wider reporting detail on screen.

When this view is enabled, Staff Activity shows staff names and links each name through to that person's staff evidence. The page stays centred on who needs attention and where to review their evidence, not on exposing the full report context.

Student emails belong with the student records

An email about a student is often evidence, but only if the school can still find it when the record is reviewed.

Student email inboxes give each student an opaque Junipa address, so relevant emails and attachments can land against the student record first, then be reviewed before they become evidence or documents. The point is not to create another inbox for staff to watch. The point is to stop important support context from living only in a personal mailbox.

This workflow is enabled with Junipa Support. It needs the school domain, sender rules and moderation defaults checked before staff start forwarding emails.

Teacher checkIf someone reads this student record next term, will they see the email that explains the adjustment, or will it still be buried in one person's mailbox?

The address should not identify the student

A student inbox address should be opaque. It should not include the student's name, student number, date of birth, year group or diagnosis.

Use an address that looks random, for example:

stn-4f9c1a2b3d4e@example-school.junipa.com.au

That address belongs to the student record, but it does not advertise who the student is. If a teacher, allied health provider or support staff member forwards an email to that address, Junipa can connect the message to the student record without putting personal details in the email address itself.

Do not publish student inbox addresses in public documents. Treat them like internal record routing addresses.

Turn on the inbox defaults before the first email arrives

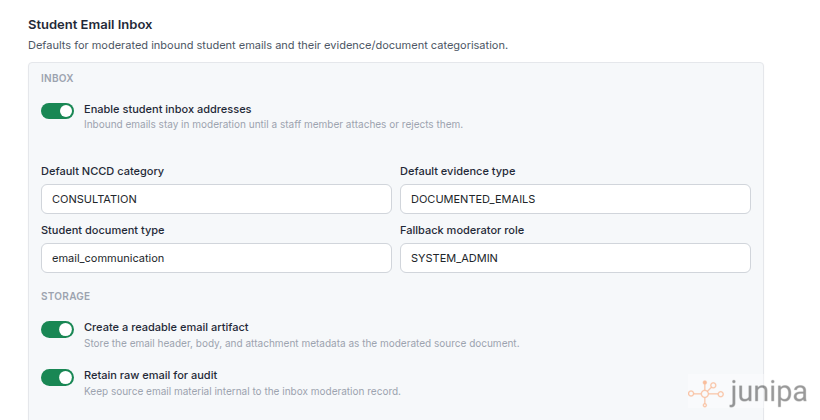
When Junipa Support has enabled student inboxes for your school, open Administration > General Settings and check the Student Email Inbox defaults.

This screenshot uses obfuscated example data. It shows the settings only, with no real school, staff or student details.

Obfuscated Junipa Student Email Inbox settings showing inbox defaults, evidence category, document type and storage controls

Check these settings before staff start using the workflow:

  • Enable student inbox addresses: turns on inbound student addresses after support has provisioned the routing.
  • Default NCCD category: sets the starting category for emails that become evidence.
  • Default evidence type: keeps emailed evidence consistent, usually as documented emails or communication.
  • Student document type: sets the document type when an email is saved to the student documents area.
  • Fallback moderator role: decides who can pick up emails that do not match a specific staff member.
  • Readable email artifact: stores a readable copy of the email header, body and attachment list.
  • Raw email retention: keeps source material available for audit where your school has chosen to retain it.

If you are unsure about the default category or document type, choose the plainest option that describes the school record. Do not make the category more specific than the email itself can support.

Send only record-worthy emails

The inbox is for student support context that should be part of the student record. It is not a general mailbox, a behaviour incident inbox, or a place to dump every message with the student's name in it.

Good examples include:

  • A parent or carer email that confirms an adjustment or support need.
  • A teacher email with an attached modified task, timetable, learning support note or work sample.
  • A specialist or allied health email that explains a recommendation the school is using.
  • A meeting follow-up that records agreed adjustments, review timing or responsibility.
  • A staff email that connects an attachment to the student's support plan.

Poor examples include:

  • Casual scheduling messages with no record value.
  • Emails about multiple students where only one student inbox address is used.
  • Sensitive medical or family information that should be handled through a more restricted process.
  • Long email chains where the useful record is one short attachment or summary.

If the email covers more than one student, split the evidence before sending it into Junipa. Each student's record should tell that student's story, not expose another student's details.

Pending emails need moderation

Inbound student emails do not become evidence automatically. They arrive as pending items first.

On the student record, staff can see when a student inbox email is waiting for review. This screenshot uses a fake sender, fake subject and fake date.

Obfuscated Junipa student record inbox panel showing one pending student email awaiting moderation

Review the pending email before it becomes part of the record:

  1. Open the student record.
  2. Check the inbox indicator near the student record tools.
  3. Open the pending email and read the stored email copy.
  4. Confirm the email belongs to this student.
  5. Decide whether it should become evidence, a student document, or be rejected.
  6. Add a short note if the decision needs context.

That moderation step matters. It protects the student record from accidental forwards, unclear email chains and messages that mention the student but do not explain an adjustment.

Keep the email useful after census week

Before accepting an email into the student record, ask whether it will still make sense later.

A useful student email record answers at least one of these questions:

  • What support was discussed or agreed?
  • Which adjustment does the email explain?
  • Who provided the information?
  • What file or attachment should be kept with the record?
  • Does the email show consultation, adjustment, monitoring or reviewed support?

The subject line alone is rarely enough. If the email body is vague but the attachment is useful, keep the attachment and add enough context in the evidence record for another staff member to understand why it matters.

Use the email report for follow-up

Schools with the student email inbox workflow can use the communication email log and email-augmented evidence views to follow up inbound messages by status.

The useful review pattern is:

  1. Check Pending moderation for emails still waiting on a decision.
  2. Check Accepted evidence for emails that became evidence.
  3. Check Saved documents for emails stored as student documents.
  4. Follow up rejected or archived items only when the decision is unclear.

This gives leaders a way to check the workflow without asking every teacher to search their own mailbox.

Roll it out slowly

Start with one student group, one support team or one evidence collection task. Make sure staff understand the difference between "send this to the student record" and "send this to a person".

A small rollout should answer these questions:

  • Who can send into student inboxes?
  • Which sender domains are allowed?
  • Who moderates pending emails?
  • Which evidence category should be the default?
  • When should an email be saved as a document instead of evidence?
  • What should staff do when an email mentions multiple students?

Once those rules are clear, the workflow becomes straightforward: use the opaque student address, review the pending item, then keep the record where future staff can find it.

The win is simple. The evidence does not vanish into a mailbox when a staff member changes role, goes on leave or leaves the school.

Junipa

Evidence remediation

Evidence remediation is for the moment when the school already knows support happened, but the record still needs repair.

Sometimes the evidence note is in Junipa, the teacher has done the work, and the missing piece is the attachment: a learning plan, meeting note, modified task, observation, email, timetable, photo or work sample that should sit with the record. The remediation view turns that broad problem into a focused list.

Instead of asking staff to check every student, it answers the useful question:

Which students have evidence records that need an attachment added now?

That matters because teachers do not need another open-ended audit. They need a short, clear set of rows where the next action is obvious.

Teacher checkIf a person outside the classroom opened this record, would they understand what support was provided, when it happened, and what file proves it?

Why remediation matters

Evidence gaps are usually specific. They are not always a sign that support is missing. Often they mean the record is nearly complete, but the file that explains the support was not attached.

That difference matters.

If the school treats every gap like a full review, staff lose time checking students whose records are already clear. If the school treats the gap as a focused remediation task, staff can concentrate on the core group of students who need a record repaired.

That is the value of remediation:

  • It narrows the work to the students who need attention.
  • It shows the evidence record that needs the file.
  • It keeps the upload action beside the row, so the person fixing it does not have to search through the student profile.
  • It gives leaders a practical way to support staff before census pressure builds.

The aim is not to create more administration. The aim is to make the missing proof visible early enough that someone can fix it calmly.

Start with the assigned list

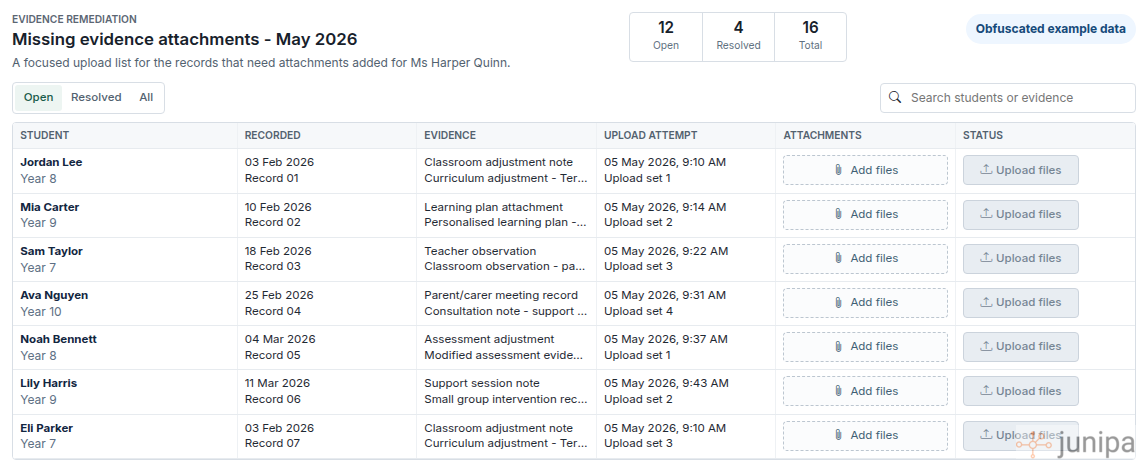
An evidence remediation view can be prepared for a specific upload task. The teacher or staff member sees the records that need attachments, with open, resolved and total counts at the top.

This screenshot uses obfuscated example data. Student names, evidence records and the staff member name have been replaced.

Obfuscated Junipa evidence remediation view showing a focused list of evidence records that need attachments

Use the list as a work queue. Start with the open rows. The student name tells you who the evidence belongs to, the recorded column tells you which record is being repaired, and the evidence column gives the context for the attachment.

The search box is useful when you are working from a folder of files or a known student group. Search for the student or evidence type, attach the file, then move to the next row.

Work one row at a time

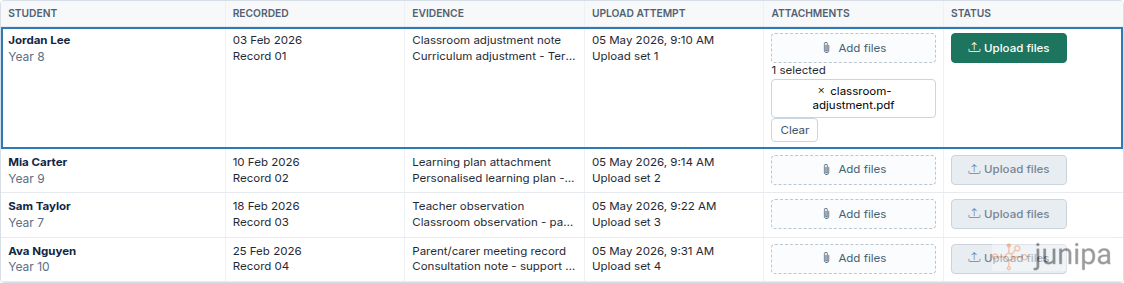
The upload area is deliberately beside the evidence row. That keeps the decision small:

  1. Read the student and evidence context.
  2. Choose the matching file.
  3. Upload it against that row.
  4. Move on when the row is resolved.
Obfuscated Junipa evidence remediation row showing a selected file ready to upload for a missing attachment

This is especially helpful when the missing attachment came from an older upload problem or a file-saving issue. The school does not need to recreate the support. It needs to reconnect the file to the evidence record.

What to upload

Choose the file that would help another staff member understand the support without needing a hallway conversation.

Good remediation attachments include:

  • The learning plan or plan review that was current at the time.
  • A modified task, assessment sample or student work sample.
  • Meeting notes from a parent, carer, teacher or support team conversation.
  • A timetable, seating plan, visual support, checklist or communication aid.
  • A case note, observation or email that explains the adjustment.

The file does not need to be long. It needs to be clear enough to connect the evidence record to the support provided for the student.

Keep the focus narrow

The strength of this view is that it protects teacher time. A remediation list should not become a fresh audit of every student in the school.

Use it for the core group where Junipa already knows which record needs attention. Once those rows are resolved, leaders can return to broader reports such as Evidence Log, Plan Coverage or Adjustments with Attachments to decide whether more follow-up is needed.

That rhythm works well:

  • Broad reports find the pattern.
  • Remediation creates the focused task.
  • Teachers upload the missing proof.
  • The school checks what is still open.

Remediation is not about blame. It is about giving the right person a short list, a clear context, and a direct upload action.

A simple weekly pattern

As census approaches, use remediation lists as part of a weekly review:

  1. Check the open count.
  2. Work through the rows that belong to your student group or upload folder.
  3. Attach the clearest matching file.
  4. Revisit the resolved count before the next review meeting.
  5. Escalate only the rows where the right evidence is still unclear.

The goal is a calmer evidence conversation: fewer vague follow-ups, fewer whole-cohort checks, and more attention on the students whose records need a concrete repair.

Junipa

Find NCCD gaps

  • Scan the Audit Report for thin records.
  • Check the Evidence Log for files and owners.
  • Review Plan Coverage for missing levels or categories.
  • Open Adjustments with Attachments for missing files.
  • Review student activity for active students not included.
  • Assign the next action in plain teacher language.

Make the next conversation obvious: which student, which record, which proof, which staff member.

What each word means in plain English

  • EvidenceA note, plan detail, file, photo, meeting record or work sample that shows what support was provided.
  • AdjustmentA change a teacher makes so a student can access learning. It might be extra time, visual prompts, a modified task, seating support, assistive technology or a different way to show learning.
  • AttachmentA supporting file connected to the record, such as a learning plan, timetable, meeting note, assessment sample, email, image or observation record.
  • Student activityA sign that staff have been working with the student in Junipa. Activity is not proof by itself, but it tells you where to look next.
  • Not includedA student or record is not counted in NCCD reporting yet. That may be correct, but someone should check why before census week.

Start with the Reports hub

The school Reports hub is the starting point. Use it to move quickly between Audit, Evidence Log, Plan Coverage, Student activity and Adjustments with Attachments instead of checking student records one by one.

Start broad. Then narrow down.

For a teacher, the useful question is simple: "Which students do I already support, and what is missing from the record?" The Reports hub helps you answer that before you open every student profile.
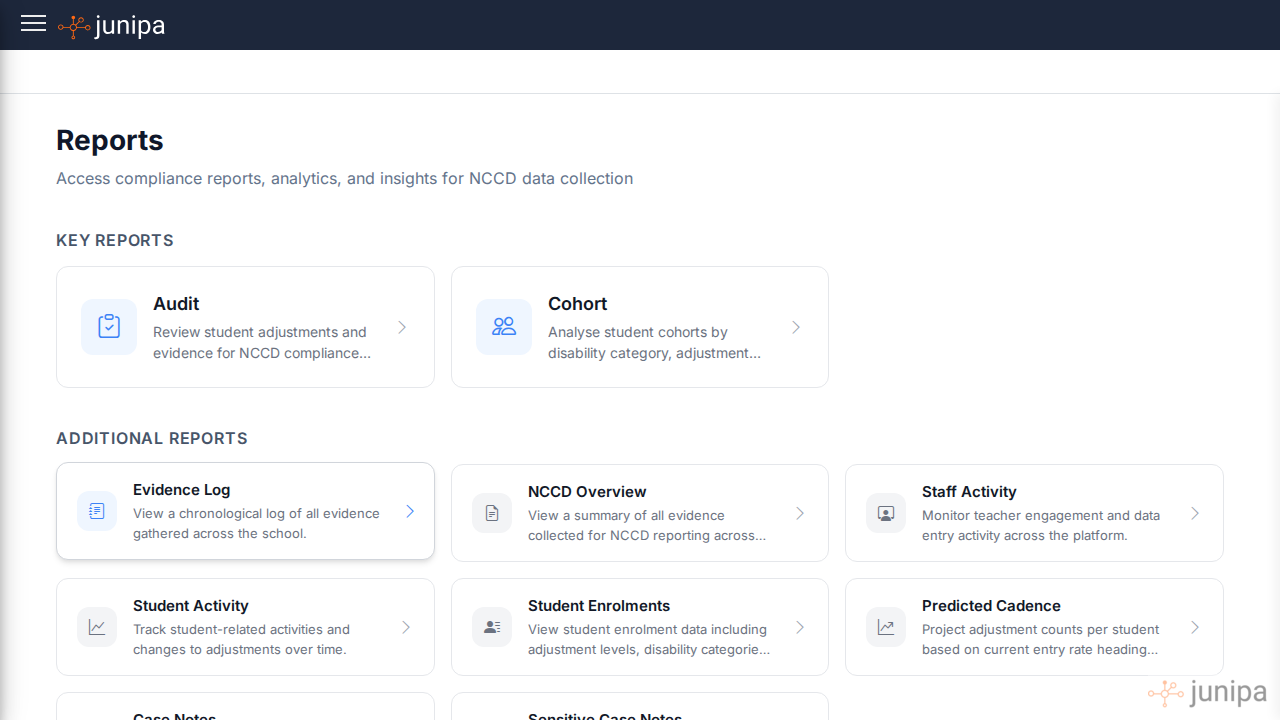
Junipa reports hub showing reporting options for schools

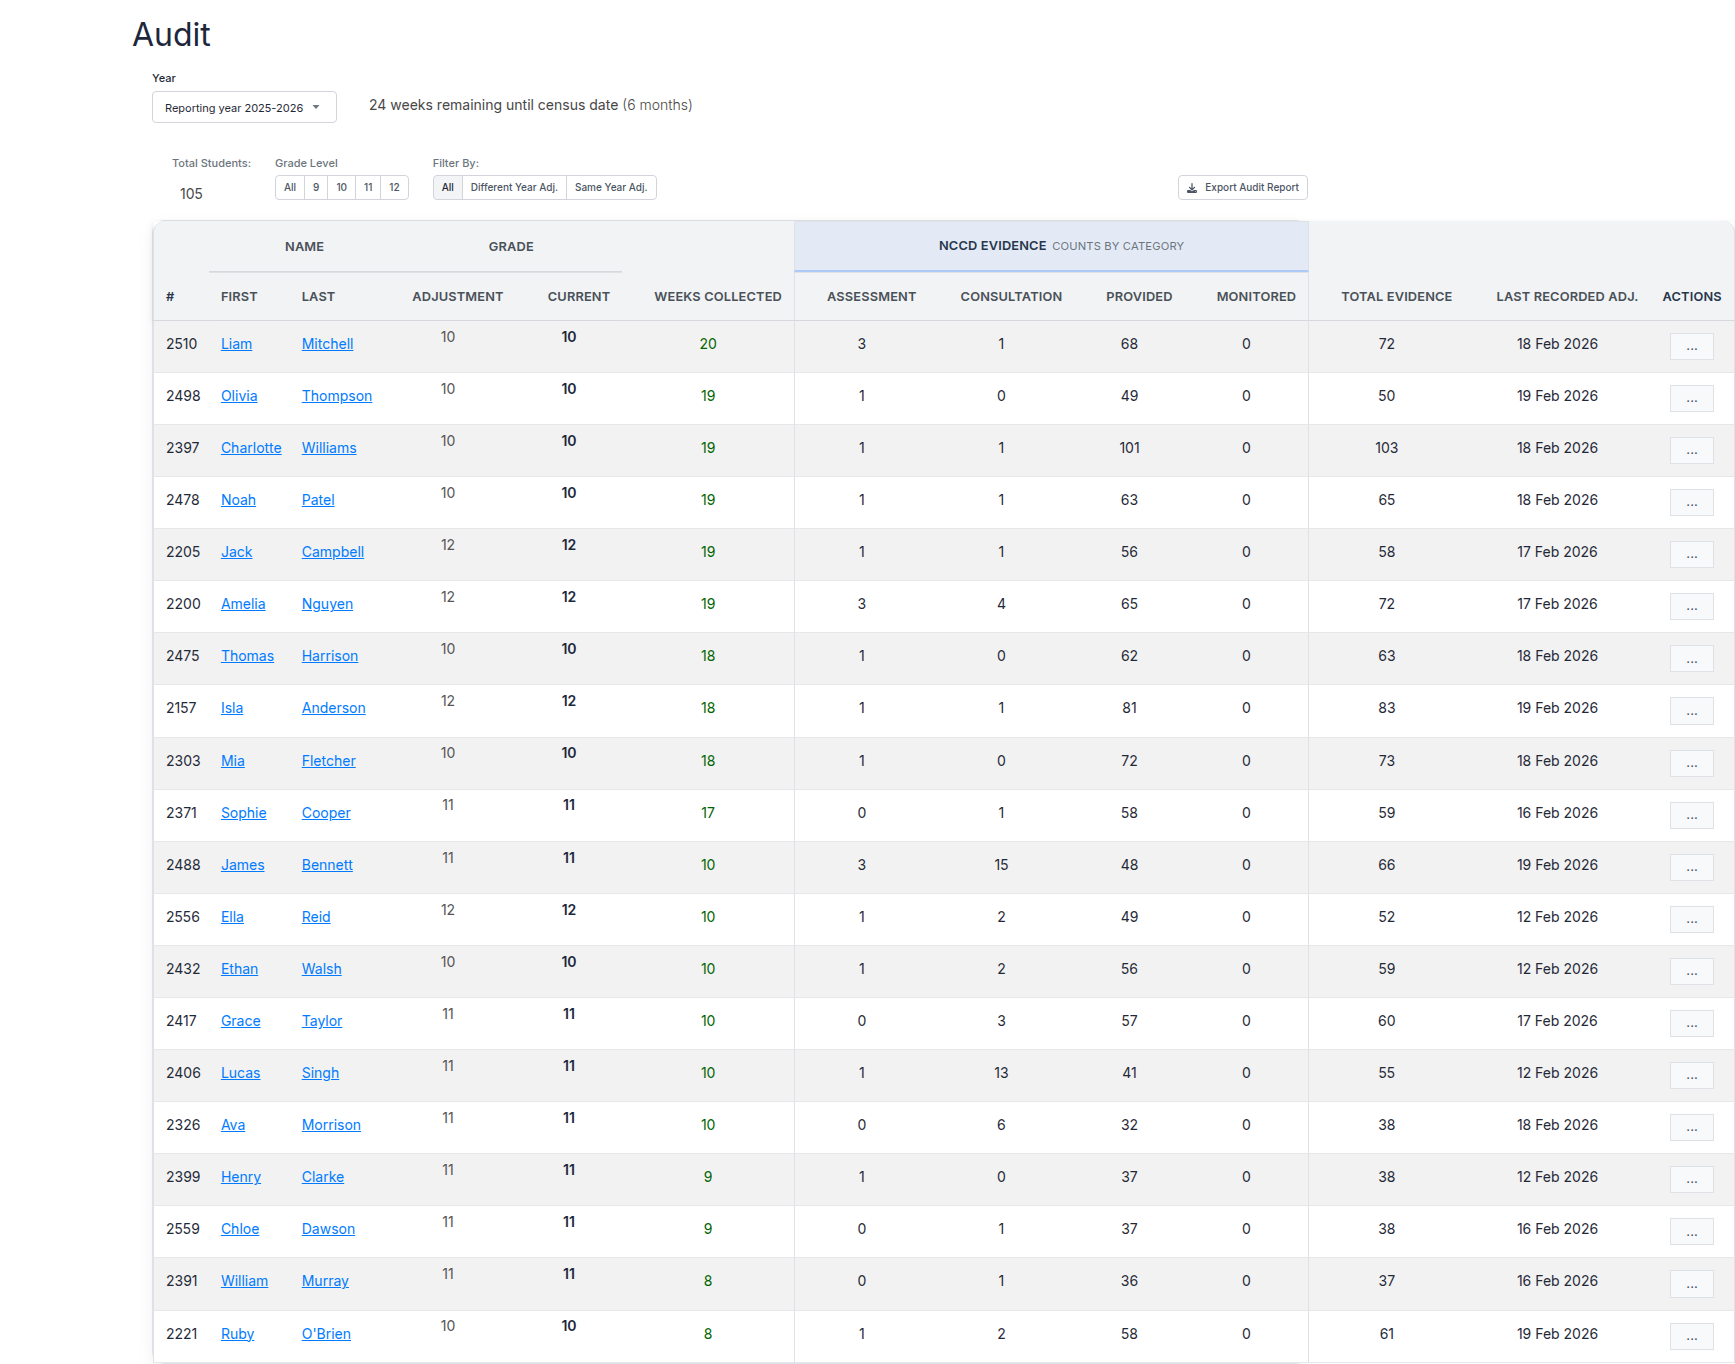
Find report gaps in the Audit Report

The Audit Report gives you the broadest evidence view first. Use it to check which students have evidence recorded, which adjustment levels are represented, and where records need attention before a formal review.

Look for:

  • Students with sparse evidence.
  • Students whose adjustment level has changed.
  • Students with adjustments or activity but no clear NCCD reporting position.
  • Evidence that does not clearly explain the adjustment being made.
  • Records that have been excluded or marked not included and need a deliberate decision.

The uncomfortable rows are the useful rows. They show where the school still has time to clean up the story.

Teacher checkPick one student row and ask: what support is being provided, how often does it happen, what has changed for the student, and what record proves it?

Use the Evidence Log when you need proof

The Evidence Log is the chronological view. It is useful when you need to answer a more specific question:

  • What evidence was recorded for this student?
  • Who added it?
  • Was a file attached?
  • Is there a linked case note?
  • Has anything been excluded from reporting?

That detail matters because census readiness is not only about having evidence. It is about being able to explain why the evidence supports the adjustment level.

Use the teacher test: would a colleague who does not teach this student understand what happened, when it happened, and why it matters for learning access?
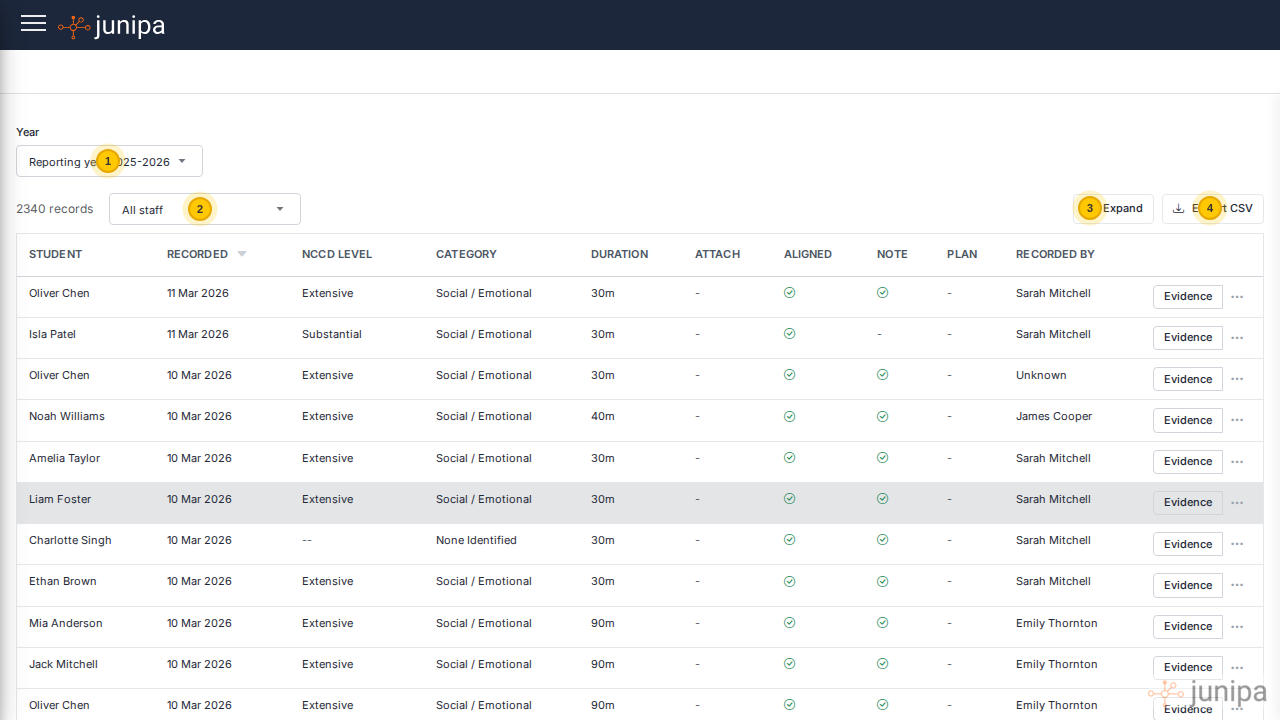
Junipa Evidence Log report showing filters and evidence rows

Check adjustments with attachments

Open Adjustments with Attachments when you need to see whether planned adjustments are backed by evidence attachments. This is the report that makes the gap plain: the adjustment exists, but the supporting attachment count may not.

Use the summary cards first. If the number of adjustments is higher than the number with attachments, you have a practical follow-up list.

Then check the row detail:

  • Evidence tells you whether an adjustment has evidence connected.
  • Attachment tells you whether that evidence has supporting files.
  • Last evidence tells you how recent the supporting record is.
  • Recorded by gives you the staff member to follow up with.

This is the report to use when the conversation is concrete. If the record says a student receives a modified task, attach the modified task. If the record says the student has a seating plan, attach the plan or the relevant note. If the record says regular check-ins are happening, add the case note that shows what changed and why.
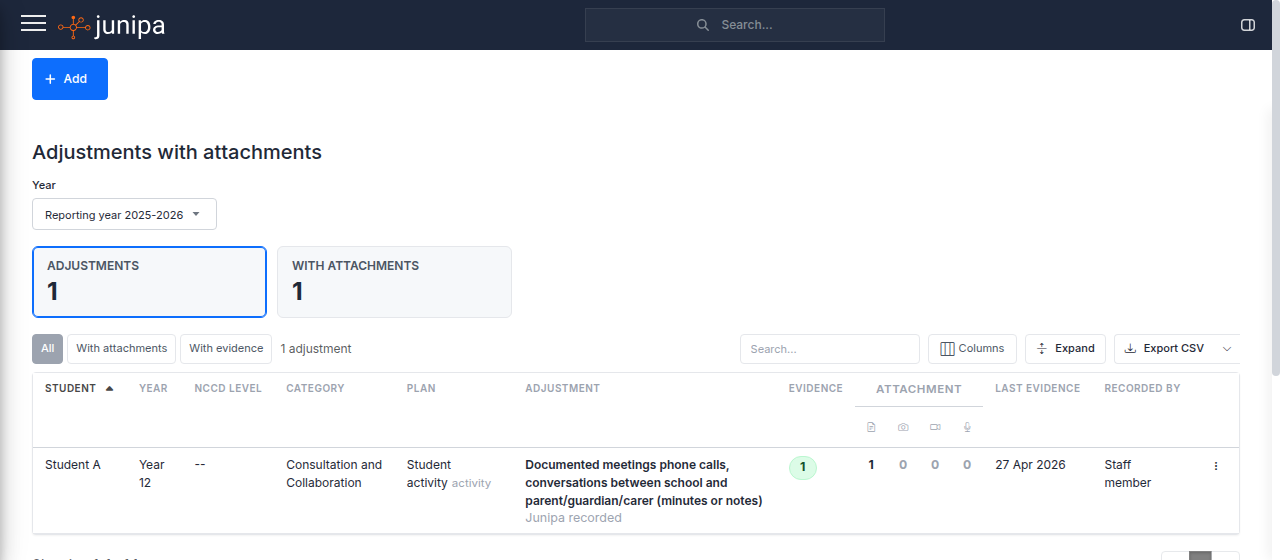
Junipa Adjustments with Attachments report showing one adjustment with supporting attachment counts

Look at Student activity before you decide a student is fine

Student activity is where you catch the students who are active in the system but still need a reporting decision.

Look for students who have case notes, adjustments, plan edits, evidence records or attachment activity, but are not included in NCCD reporting yet. They may be correctly not included. They may also be the students most likely to be missed if the review only starts from the final census list.

That is the courage part. Do not only check the tidy list. Check the students sitting just outside it.

Do not use activity as the final answer. Use it as the signal to follow up. A student with regular activity may need stronger evidence, a clearer adjustment, or a deliberate decision that they should stay out of the census list.

Check Plan Coverage before you chase individual records

The Plan Coverage view helps you see whether plans and evidence are distributed across the school in the way you expect. It breaks coverage down by year group, so you can spot patterns before opening individual student records.

Use it to find:

  • Year groups with students missing NCCD levels.
  • Cohorts with disability categories still unclassified.
  • Students with plans but no evidence.
  • Evidence coverage that looks too light for the adjustment level being claimed.

Treat the gaps as a to-do list, not a blame list. Plan Coverage helps leaders decide where to help teachers first: one year group, one cohort, one category, or one set of missing records.
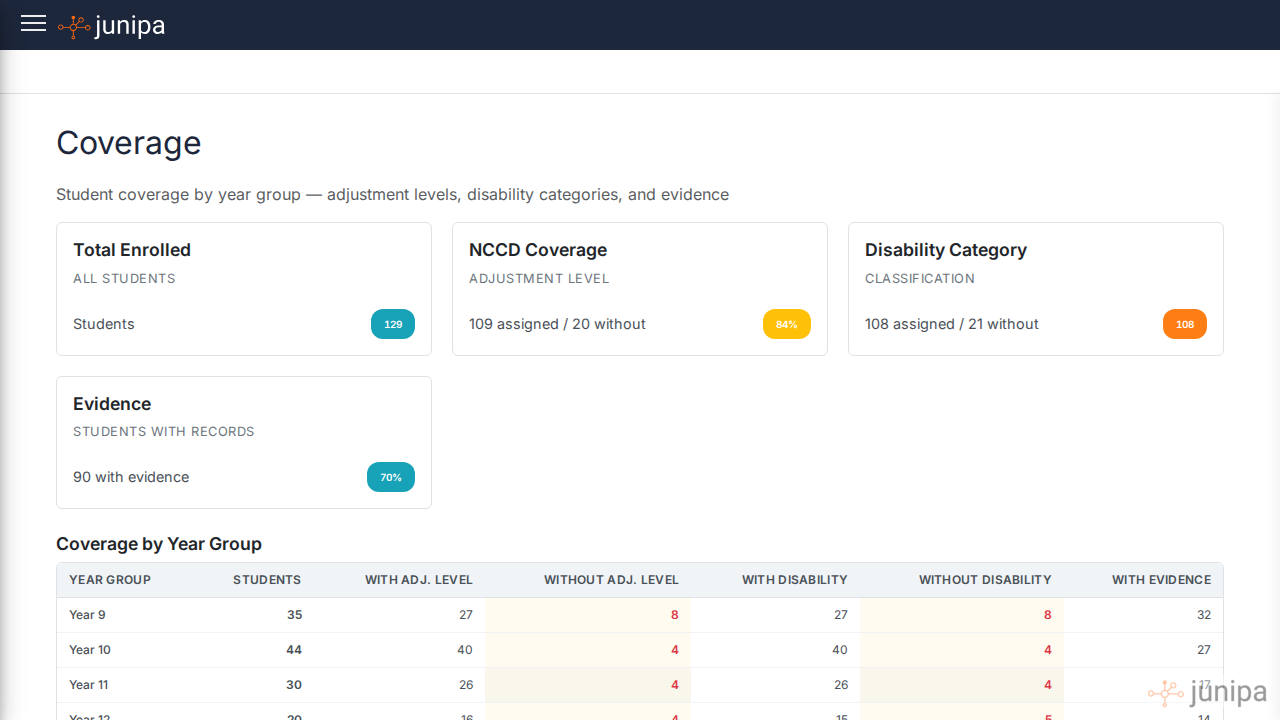
Junipa Plan Coverage report showing school-wide plan and evidence coverage by year group

Keep student records connected

If your school uses Compass or Wonde, student details can stay in sync from your student information system. That reduces manual record drift, especially around enrolments, year levels and departures.

Before census, check that your integration is still running and that departed or re-enrolled students are showing the way you expect. A reporting gap is sometimes an evidence problem, but it can also be a student record problem.

For the broader product picture, the main Junipa site explains how schools use Junipa across NCCD, evidence, adjustments and school workflows. The Junipa updates page is the place to check recent product changes that may affect reporting work.

A simple weekly review pattern

Run this pattern weekly as census approaches:

  1. Open the Audit Report and scan for students with weak or missing evidence.
  2. Open Adjustments with Attachments and find planned adjustments without supporting files.
  3. Open Plan Coverage and check whether a year group or cohort needs attention.
  4. Use the Evidence Log to investigate the records that look thin or unclear.
  5. Check student activity for students with real support activity who are not included in reporting.
  6. Confirm student details are current if your school syncs through Compass or Wonde.
  7. Assign follow-up work in your normal school process, then review the same reports again.

Words teachers can use

When asking for evidence: "Can you add the note, file or example that shows this adjustment happened for the student?"

When checking an adjustment: "Is this still what we do for the student, and does the record say it clearly?"

When a student is active but not included: "This student has support activity in Junipa. Can we confirm whether they should be included in NCCD reporting or deliberately left out?"

When the record is unclear: "A person outside this class needs to understand the support from the record. What detail should we add?"

The promise is simple: if the gap is visible early, the school can act before census week turns it into a scramble.
Junipa

My Junipa and Case Note Mentions

My Junipa

My Junipa is the place to check when you need to know what is waiting for you. It brings personal notifications into one view so you are not checking signatures, student journals, consent activity and case notes in separate places.

It includes:

  • Incoming email signatures from consent and communication workflows.
  • Adjustment mentions when you are tagged on a student's adjustment.
  • Consent notifications when a parent gives or withdraws consent.
  • Case note activity showing recent notes across your students.
  • Tasks connected to plans, communications and notes where you are tagged.

Where to look: open My Junipa from the main navigation. Use the filters across the top of the communications list to narrow the view to signatures, emails, messages or mentions.

Case Note @Mentions

Mention a colleague directly in a case note using @ and they receive a real-time notification. The notification includes a direct link to the student journal, so they can jump straight to the context.

Use this when a note needs another staff member's attention, for example when a teacher adds classroom context that a case manager should review, or when leadership needs to know a follow-up has been recorded.

Mention Notifications

When someone @mentions you, it appears instantly in your My Junipa feed as a case note item with an @ indicator. Click the notification to go straight to the student journal entry.

That matters most when the note is not the final answer. A mention gives the right person a path back to the student record, with the surrounding evidence and plan context still close at hand.


v3.1.22 - 24th March 2026

Easy In, and Just as Easy Out

Most school software is easy to join and hard to leave. The data goes in cleanly, then quietly becomes the reason you cannot move. By the time a school wants to switch, the records are locked inside a shape only that one vendor can read.

Junipa is built the other way around. Onboarding is quick. Offboarding is quicker. And the records you take with you arrive in a format another system can actually use.

Your data is yours

Every piece of information you put into Junipa belongs to you. Student plans, unit plans, evidence records, adjustment histories, audit reports, sign-offs. All of it.

This is not a clause in a contract you hope you never need. It is a principle the product is designed around. At any point you can export your data and take it with you, without asking permission and without waiting on a support ticket.

Leader checkIf you decided to leave today, could you walk out with every student record in a form your next system could read? With Junipa, yes.

Getting in is the easy half

Junipa connects to the student management systems schools already run. Direct imports and live syncs mean enrolments, classes and demographics arrive automatically and stay current, so you are not retyping a spreadsheet into a new tool on day one.

Quick onboarding matters because the work that follows is the point. The faster your student data is in place, the faster staff can get on with recording adjustments and building evidence. Import is not the achievement. It is the starting line.

Getting out is the half most vendors skip

Every report in Junipa can be exported. The Audit Report, the Census Report, student plan summaries, evidence logs, the lot. CSV, PDF, or both. No premium tier, no export quota, no quiet limit on how often you can run it.

The exports are not screenshots of your data. They are your data, structured so a person and a machine can both read it. Columns are named plainly. Relationships between a student, a plan and its evidence are preserved rather than flattened into a single unusable sheet.

A format other systems can read

This is the part that separates a real export from a token one.

When your records leave Junipa, they leave in a clean, documented structure. Standard fields, predictable layout, the kind of file an analyst or another vendor can map without reverse engineering. It is enough structure that you can stand the data up somewhere else and get moving, and enough openness that it connects to whatever student management system you choose next.

That is the whole intent. Not a proprietary container, not a one-way archive you can only open inside Junipa. A usable working format that lets you get up and running elsewhere and connect your records into an existing system, without a migration project and without a translation layer in the middle.

Why we build it this way

Software that makes it hard to leave is software that does not trust its own value. Lock-in is what you reach for when you are worried the product cannot hold a school on merit.

We would rather earn the next year than trap you into it. The effort we spend on getting your data out is the same effort we spend on getting it in, because both halves are your data moving on your terms.

Easy in. Just as easy out. The records are yours the whole way through.

Junipa

Preparing for Census

NCCD Census reporting time is approaching. How can we make sure that all data is in the one place?

Census period2026DAYS TILL CENSUSStudent Management SystemCompassWondeJunipaCensus reporting

Your data, connected

Junipa integrates with student management systems through Wonde and directly with Compass. Student details, enrolment records and attendance data flow into Junipa automatically. The source of truth remains your student management system. Junipa can write to it.

Once connected, there is nothing to maintain. When a new student enrols or a record changes in your SMS, Junipa picks it up.

Always ready for auditing and compliance

With your student data flowing in, Junipa handles the aggregation and management layer. Unit plans, student plans and reporting information are built on top of live data. You are not preparing for Census at the last minute. You are constantly ready.

When it is time to report, the data is already organised, the evidence is already gathered and the adjustments are already documented.

Student Management SystemJunipaStudent detailsEnrolment dataAttendance recordsProfile matchingEnrolment checkAttendance logCreate recordUpdate recordActive enrolmentTransfer studentRegularAt riskStudent planUnit planMonitorFlag & alertEvidence gatheredReview & documentationAdjustment levelAudit trailAudit reportCensus readyClick to enlarge
Junipa