Student mail drop
Student mail drop gives each student their own Junipa email address. Forward an email about a student to that address and it lands in the student's mail drop, ready to file as evidence, a student document, or against an adjustment. The original message and any attachments are kept together, so the supporting trail stays with the student.
This is new. It removes the copy, paste and re-upload step that used to sit between an email and a student record. For the thinking behind it, read Student emails belong with the student records.
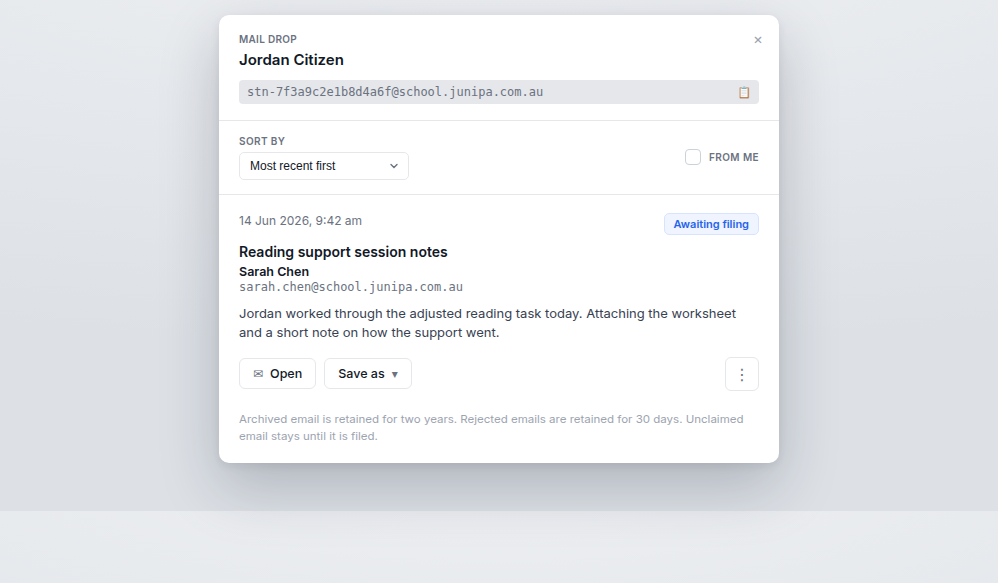
Find a student's mail drop address
- Open the student record from your dashboard, search, a class group or a student group.
- Select the envelope icon at the top of the student record. The mail drop panel slides out.
- The student's Junipa email address sits at the top of the panel, under Mail drop.
- Select anywhere in the grey address field, or the copy icon at the end of it, to copy the full address to your clipboard.
The address only accepts email sent to your school's Junipa domain. The whole address, including the shielded domain on the right, reads as one field — copy it and you have everything you need. That's it; there is nothing else to set up.
Send an email into a student's record
- Copy the student's mail drop address from the panel.
- In your email client, forward or send the message to that address.
- Include any attachments you want kept with the record. They are stored alongside the message.
- The message appears in the student's mail drop, marked as awaiting filing.
You can forward an existing thread, or send a new message. The sender, subject, date and body are all kept.
Which senders are allowed
A student's mail drop address does not accept mail from just anyone. It only accepts mail from approved senders. This keeps the record clean and stops unexpected senders from landing in a student's mail drop.
A sender is approved in one of two ways:
- Their domain is on the allowlist. Your sign-on and login domains, such as your single sign-on or auth domain, are allowed automatically. Your staff email domains are detected for you and listed under Staff email domains for the administrator to confirm. Confirmed domains, plus any extra domains added by hand, make up the allowlist.
- They are a known Junipa user. Mail from a staff member who already has a Junipa account is treated as approved and attributed to them, even when they send from a personal address that is not on a listed domain. So staff sending from a school account, or from their own account, do not need anything set up.
Your school administrator manages all of this under Administration > General Settings > Mail drop rules. Detected staff domains are confirmed under Staff email domains; senders outside the school, for example a partner allied health provider, go under Additional allowed sender domains, one domain per line. Personal email providers such as Gmail or Outlook are never offered for confirmation.
Email from a sender who is not approved is quarantined. It is recorded so staff can see who tried to email the student, but it is not filed into the record, it does not appear in the awaiting filing list, and it is removed after fourteen days. The sender gets no reply. Forwarding from an unlisted personal address that is not tied to a Junipa account will not reach the student record, so use a school account or ask your administrator to add the sender's domain first.
If an email you expected never appears in a student's mail drop, check whether the sender is approved. If the sender is one you trust, ask your school administrator to confirm their domain under Mail drop rules.
File a message
Open the mail drop panel and choose an action for each message.
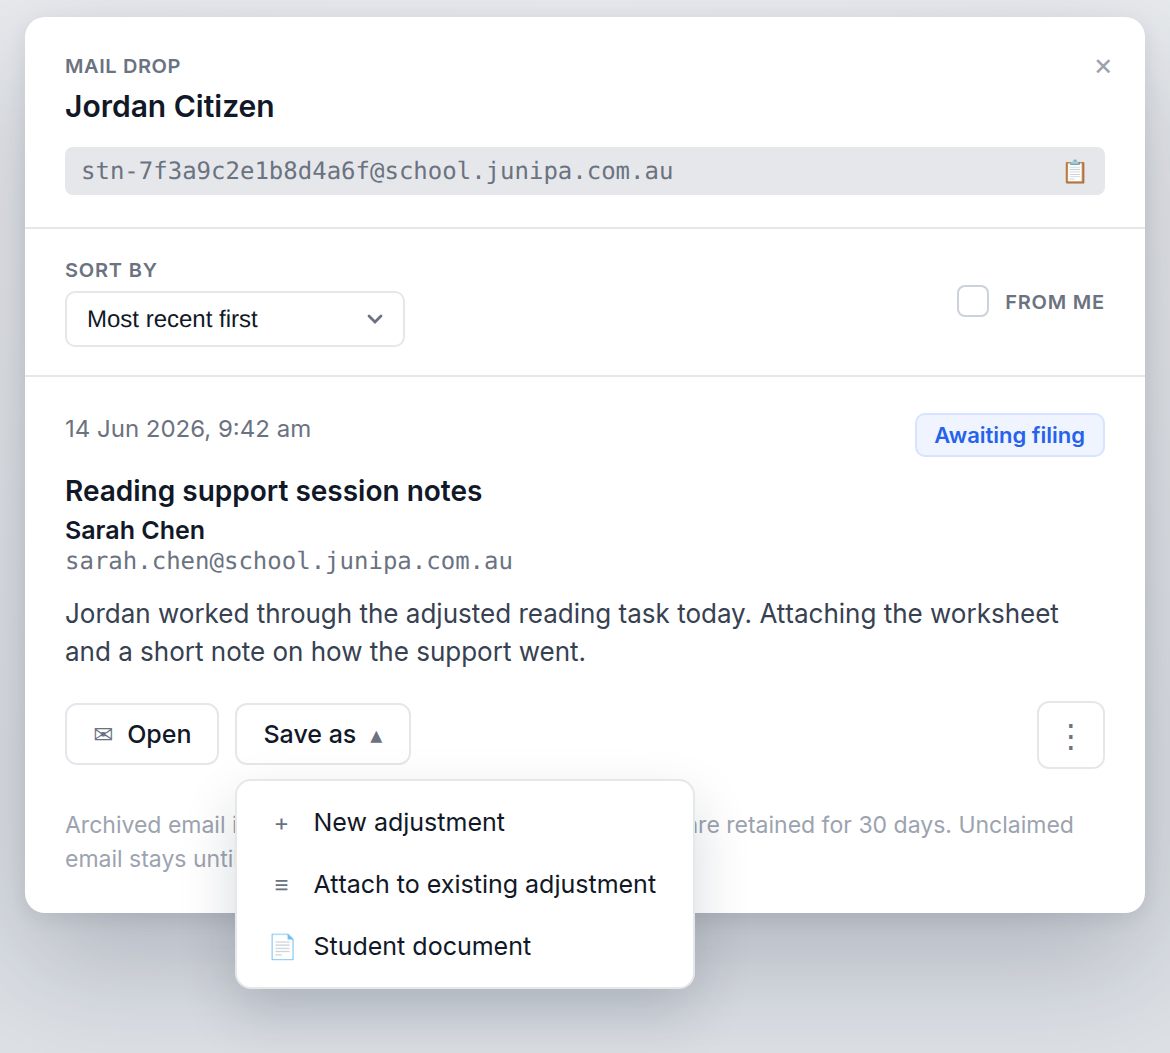
- Open reads the message in place, including the sender, the date, and any attachments.
- Save as files the message:
- New adjustment opens the evidence form prefilled from the email, so you can record it as adjustment evidence. You still choose the category before saving.
- Attach to existing adjustment files the email against an adjustment the student already has.
- Student document saves the message as a document on the student record.
- Archive keeps the message but removes it from the awaiting filing list.
- Reject removes a message that does not belong on the record.
Once a message is filed, it leaves the awaiting filing list.
Choose what gets filed
An email is often two things at once: the message a colleague wrote, and the report, form or photo they sent with it. Junipa asks you which one belongs on the record, so a specialist report is filed as the report and not buried inside a forwarded email.
When you file a message you choose one of three options:
- The email itself. The message, its sender, date and body are kept as the record. Use this when the words in the email are the evidence, for example a parent describing what happened at home, or a teacher explaining an adjustment they made.
- The attachments. Each attached file is filed in its own right. Use this when the email is only the delivery method and the real record is the specialist report, assessment, consent form or work sample.
- Both. The email is kept as the record and the attachments are filed alongside it. Use this when the covering message adds context the file does not carry on its own.
Attachments can be opened in the viewer before you decide, so you can confirm what a file actually contains rather than filing on the strength of its file name. Where a message carries several attachments, Junipa walks you through them so each one gets its own filing decision rather than everything landing in one place by default.
Attach an email to someone else's adjustment
Filing an email against an existing adjustment normally works on adjustments you recorded yourself. Administrators can attach a message to any adjustment on the student record, whoever recorded it.
This matters when an email arrives for a teacher who is away, or when the supporting file belongs on an adjustment a case manager recorded weeks earlier. The administrator files the email onto the right adjustment rather than creating a duplicate entry to hold it. The original adjustment keeps its recorded staff member, and the attachment is stamped with the person who filed it.
If you cannot see an adjustment recorded by another staff member when filing, you do not have administrator access. Ask your school administrator to file the message, or record the evidence on your own entry instead.
Sort and filter the list
Use the controls above the list to find the right message quickly.
- Sort by orders the list by most recent first, or by sender.
- From me shows only the messages that came from you.
How long messages are kept
- Archived email is retained for two years.
- Rejected emails are retained for thirty days.
- Unclaimed email stays in the mail drop until it is filed, archived or rejected.
Who can use mail drop
By default, once mail drop is on, everyone at the campus can use it. Your school administrator can narrow that under Administration > General Settings > Mail drop rules > Access, choosing one of:
- Available by default — everyone at the campus.
- Available to all except listed users or roles — everyone, minus the staff or roles the administrator lists.
- Available to only listed users or roles — only the staff or roles the administrator lists, such as case managers and administrators.
If you cannot see the envelope icon on a student record, your school may not have mail drop turned on yet, or your access may be limited to certain staff or roles. Ask your school administrator.
Turning mail drop on
Mail drop is set up by your school administrator under Administration > General Settings > Mail drop rules. Turn on Enable student inbox addresses, and every student record shows the envelope icon with its own address issued automatically. There is nothing to set up per student.
Live schools detect their mail drop domain automatically from the school address. The Mail drop domain field is there to override it, or to use mail drop on a local or test environment. While you are there, confirm your Staff email domains so staff mail is approved, and set the Default NCCD category used when filing an email as new evidence.